Hexo主要设置和所装插件
以下内容管理员所见:
2.Valine
通 过 安 装 : npm install next-theme/hexo-next-valine
安装评论valine
- 注册leancloud,建议选择国际版。leancloud既能管理评论,也能统计阅读情况。在创建的应用里点击
数据存储-结构化数据-创建Class,点击创建Class,新建名为Comment,选择无限制,其它默认,然后点击创建,用来查看评论。 再在数据存储-结构化数据-创建Class,点击创建Class,新建名为Counter,选择无限制,其它默认,用来统计阅读。 - next主题8.7没有自带valine评论,安装:
npm install next-theme/hexo-next-valine。valine相关文件会下载至Hexo\node_modules\hexo-next-valine,打开该文件夹里的default.yaml,全部复制,粘贴到主题配置文件里。
# For more information: https://valine.js.org, https://github.com/xCss/Valine
1 | # Valine |
- 在leancloud
设置-应用凭证里复制AppID和AppKey,粘贴到appId和appKey,注意冒号后面有空格,并且不要和#连着。 在设置-安全中心-Web安全域名里添加自己的网址。其余按需修改。 注意,如果出现Code 401: 未经授权的操作,请检查你的AppId和AppKey,会发现有评论框但是不能提交评论。在设置-应用凭证里复制REST API 服务器地址,粘贴到serverURLs:,即可解决。 - 主题配置里自带leancloud的阅读统计功能。如果启用,其中
app_id:``app_key:``server_url:按照valine里的填写。
1 | leancloud_visitors: |
- valine、leancloud和busuanzi的统计有冲突,建议如下设置:
1 | valine: |
- 如果在阅读统计中出现
Counter not initialized! More info at console err msg.,设置leancloud_visitors.security = false,如下:
1 | leancloud_visitors: |
3.Artitalk 说说
参考:
https://blog.csdn.net/cungudafa/article/details/105938885
https://zhuanlan.zhihu.com/p/424932976
4.本地搜索
安装:npm install hexo-generator-searchdb
Hexo config :
1 | search: |
NexT config :
1 | # Local search |
5.增强插件 hexo-enhancer
安装:npm install hexo-enhancer –save
_config.yml配置的标签可以是这样的:
1 | keywords: HTML, JavaScript, Hexo |
hexo-enhancer会扫描您的.md文章,如果文章内出现以上关键词,则自动将其分配如文章的tags属性中。
需要特别指出的是,keywords是标准配置,它最终会出现在网页meta中,而tags是自定义的属性,只会被本插件使用。
6.代码高亮
安装:npm i -S hexo-prism-plugin highlight
然后,修改 Hexo 根目录下 _config.yml 文件中 highlight.enable 的值为 false,并新增 prism 插件相关的配置,主要配置如下:
1 | # 这一部分高亮插件与原来的highlight一样的,保留其一,这里有安装prism独立插件所以【关掉】,同时也要在NexT主题里面的prism开关关掉。 |
参数说明:
Options
- mode:
- realtime (Parse code on browser in real time)
- preprocess (Preprocess code in node)
- theme:
- default
- coy
- dark
- funky
- okaidia
- solarizedlight
- tomorrow
- twilight
- atom-dark
- base16-ateliersulphurpool.light
- cb
- duotone-dark
- duotone-earth
- duotone-forest
- duotone-light
- duotone-sea
- duotone-space
- ghcolors
- hopscotch
- pojoaque
- vs
- xonokai
- line_number:
- true (Show line numbers)
- false (Default, Hide line numbers)
- no_assets
- true (Stop loading asset files)
- false (Default, load script and stylesheets files)
6.搜索 hexo-generator-search
安装:npm install hexo-generator-search –save
在 Hexo 根目录下的 _config.yml 文件中,新增以下的配置项:
1 | search: |
7.加密 hexo-blog-encrypt
安装 npm install --save hexo-blog-encrypt
_config.yml 配置:
1 | # Security 文章加密 安装 npm install hexo-blog-encrypt |
8.自动摘要 hexo-excerpt
https://github.com/chekun/hexo-excerpt
安装:npm install hexo-excerpt –save
1 | excerpt: |
方法一
原理
在Hexo生成首页HTML时,将top值高的文章排在前面,达到置顶功能。
修改方法
修改Hexo文件夹下的node_modules/hexo-generator-index/lib/generator.js,在生成文章之前进行文章top值排序。
需添加的代码:
1 | posts.data = posts.data.sort(function(a, b) { |
复制
其中涉及Javascript的比较函数:
1 | cmp(var a, var b) { |
复制
修改完成后,只需要在front-matter中设置需要置顶文章的top值,将会根据top值大小来选择置顶顺序top值越大越靠前。需要注意的是,这个文件不是主题的一部分,也不是Git管理的,备份的时候比较容易忽略。
修改内容
以下是最终的generator.js内容,可以直接复制替换node_modules/hexo-generator-index/lib/generator.js的内容
1 | 'use strict'; |
方法二【推荐】
1 | $ npm uninstall hexo-generator-index --save |
置顶文章配置
然后在需要置顶的文章的Front-matter中加上top: true或者top数字top: 1:
1 | title: 置顶 |
按照数字大小依次往下置顶排序
置顶标志
置顶的文章会显示在主页最上面,没有明确的置顶标志,我们需要键入置顶标志。
设置置顶标志
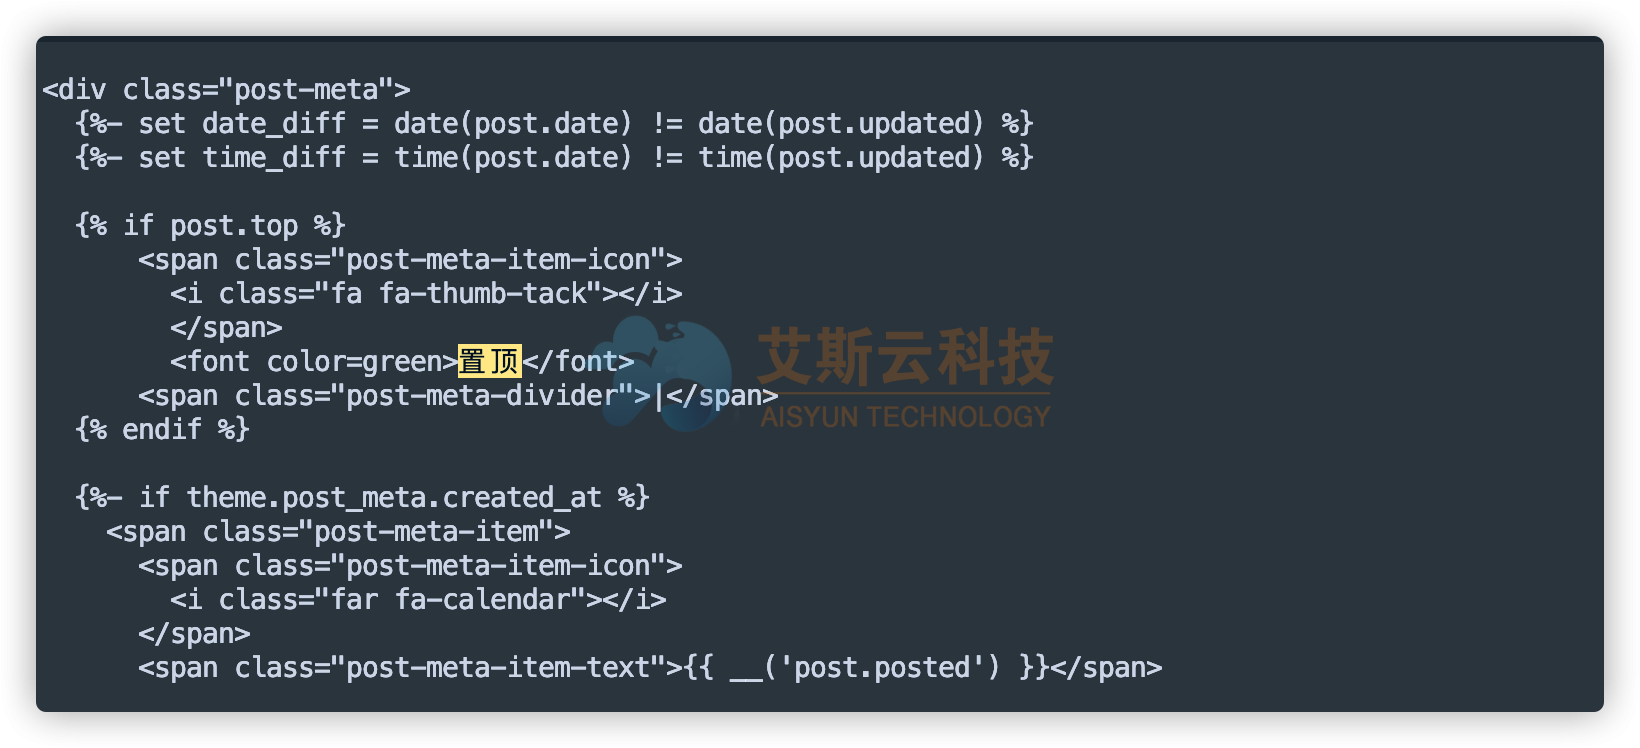
打开:node_modules/hexo-theme-next/layout/_partials/post/post-meta.njk文件,定位到<div class="post-meta">标签下,插入如下代码:
第二段代码:
1 | {% if post.top %} |
第二段代码:二选一(目前使用)
1 | {% if post.top %} |
