[TOC]
说明
手动安装官方文档参考:部署 Seafile 专业版
安装完后如果需要使用在线编辑的可以选择如下:
- 土豪级,使用效果非常好。
- 单独部署,服务器需要8核20G以上
- 如果外网需要使用,在线编辑端口需要使用443、80土豪级端口
onlyoffice 点击这里
- 可以和seafile装在同一台机器上面
- 资源消耗小,在线编辑效果一般
- 对于端口没有限制
脚本特色功能:
- 基于官方脚本修改,实现宝塔环境下脚本安装。
- 相对于纯手动安装,脚本安装会配置nginx和memcached,提升访问性能。
- 一键下载并安装企业版seafile 7.1.12
- 一键下载libreoffice并开启Office文档在线预览
- 可以选择seafile的安装目录,在哪个目录下运行脚本,就会自动安装到当前目录下。
- 更换pip安装源为阿里云,默认为国外,极大提升pip包安装速度(2021/9/3 新增)。
- (2021年11月2号)修复Pillow安装失败的问题,Pillow现在需要
zlib和xcode。
- (2022年4月15号)修复Centos源,统一改为阿里云centos-vault源,centos 8官方源已下线。感谢
蛋蛋的反馈提供
环境准备
准备Ubuntu20.04/18.0.4或者centos8.X
注意一点要纯净干净环境,没有安装过其它带Nginx/MySQL/Memcached/libreoffice****(已有环境不可安装,如果发现seafile预览报错,可能初始系统已安装过libreoffice,推荐重做干净系统)
先安装好宝塔
Centos 8.X安装命令:
1
2
3
4
5
6
7
8
9
| #更换yum(centos8官方源已下线,建议切换centos-vault源)
#删除原来的
rm -rvf /etc/yum.repos.d/*
#下载新的
wget -O /etc/yum.repos.d/CentOS-Base.repo https://mirrors.aliyun.com/repo/Centos-vault-8.5.2111.repo
#生成缓存
yum makecache
#开始安装
yum install -y wget && wget -O install.sh http://download.bt.cn/install/install_6.0.sh && sh install.sh
|
Ubuntu/Deepin安装命令:
1
| wget -O install.sh http://download.bt.cn/install/install-ubuntu_6.0.sh && sudo bash install.sh
|
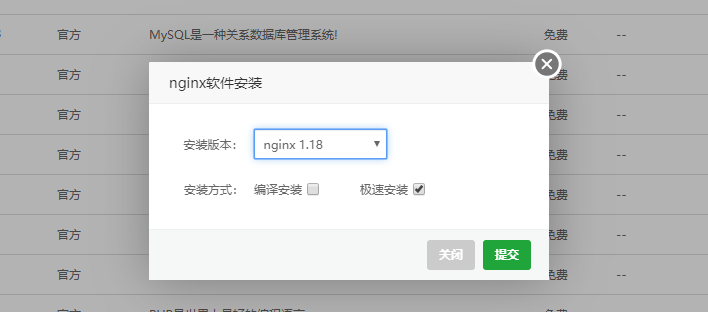
宝塔安装完成后,安装nginx
![img]()
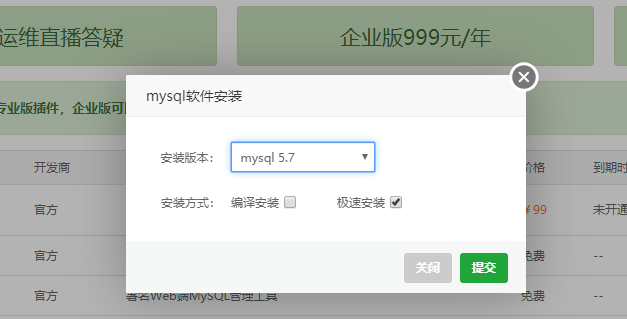
然后在宝塔里安装mysql
![img]()
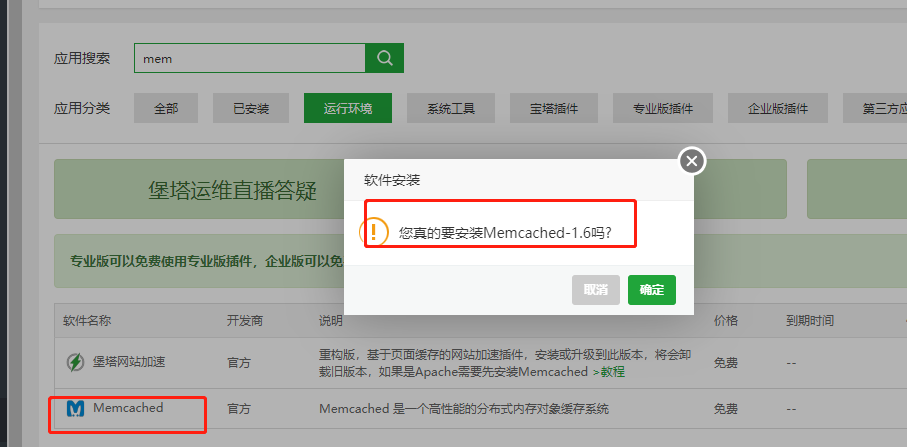
再进行安装Memcached
![img]()
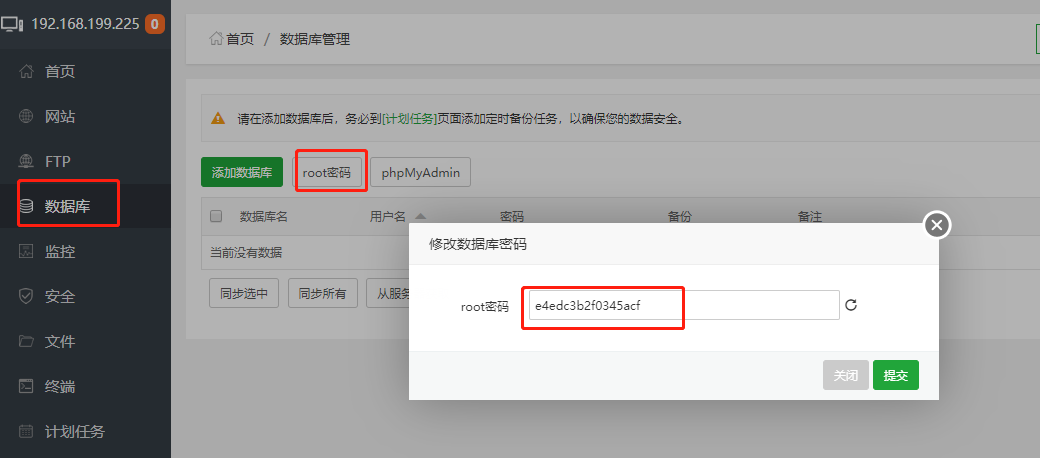
宝塔上面安装完成nginx,mysql和Memcached后开始安装seafile。
确保宝塔上面已经安装完成nginx,mysql和Memcached并已经启动服务。
查看数据库root用户密码
点击数据库-root密码 务必记住数据库root用户的密码,后续安装seafile的时候会用到。
![img]()
seaifle安装教程
1、脚本会自动下载seafile 企业版7.1.12 并安装到当前目录下的seafile文件夹(不可自己手动建),比如想安装到/home目录,就切换到home目前并执行下面脚本。
2、脚本安装完成后,默认管理员账号密码如下,为安全考虑,请务必修改管理员密码。
#默认管理员账号:****admin@seafile.local
#默认管理员密码:****admin
Centos8.X安装命令:
1
2
3
4
5
| #切换到安装目录。比如想要安装到/home目录为例
cd /home
#脚本会自动下载安装包并安装,防止输错,请直接复制命令到窗口运行(大约需要30分钟)
#"e4edc3b2f0345acf" 替换成实际环境的数据库密码(就是上面让你记住的密码)
wget -O install_seafile_bt_7.1.sh https://yun.ittel.cn:1443/f/33584b7eb06a4734815a/?dl=1 && sh install_seafile_bt_7.1.sh e4edc3b2f0345acf
|
Ubuntu18.0.4及以上/Debian 10安装命令:
1
2
3
4
5
| #切换到安装目录。比如想要安装到/home目录为例
cd /home
#脚本会自动下载安装包并安装,防止输错,请直接复制命令到窗口运行(大约需要30分钟)
#"e4edc3b2f0345acf" 替换成实际环境的数据库密码(就是上面让你记住的密码)
wget -O install_seafile_bt_7.1.sh https://yun.ittel.cn:1443/f/9a1971fd06ce4bbe8333/?dl=1 && sudo bash install_seafile_bt_7.1.sh e4edc3b2f0345acf
|
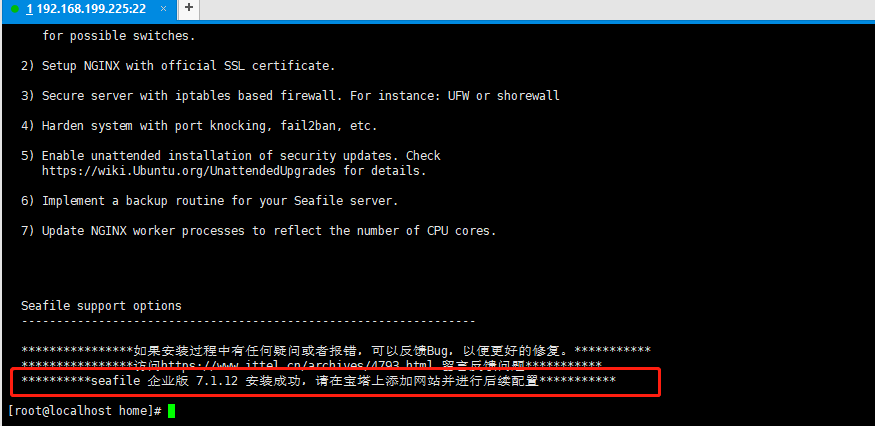
确认脚本是否已经成功安装seafile
请确认已经成功安装,如果没有提示,请检查上一步数据库密码是否填写正确。或联系站长进行反馈(在最后)
![img]()
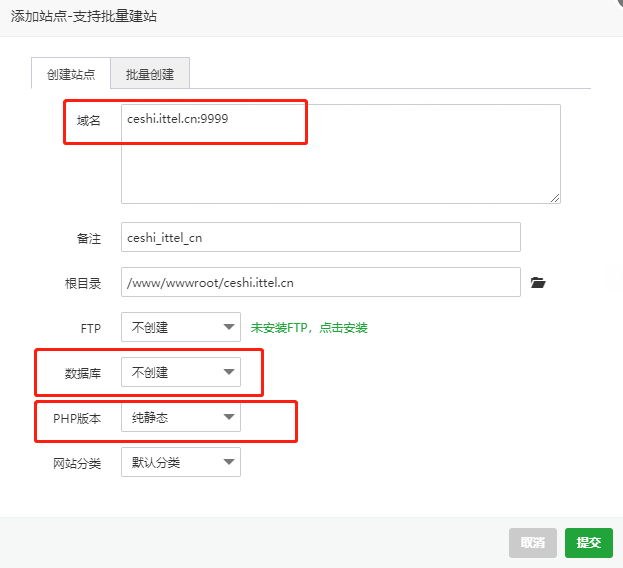
宝塔中添加网站
根据实际情况创建一个纯静态网站,比如这里已 ceshi.ittel.cn,端口 9999 为例。
![img]()
复制下面配置并粘贴到网站的默认配置文件中
1
2
3
4
5
6
7
8
9
10
11
12
13
14
15
16
17
18
19
20
21
22
23
24
25
26
27
28
29
30
31
32
33
34
35
36
37
38
39
40
41
42
43
44
45
46
47
48
49
50
51
52
53
| log_format seafileformat '$http_x_forwarded_for $remote_addr [$time_local] "$request" $status $body_bytes_sent "$http_referer" "$http_user_agent" $upstream_response_time';
server {
#端口
listen 9999;
#实际域名或者IP
server_name ceshi.ittel.cn;
proxy_set_header X-Forwarded-For $remote_addr;
location / {
proxy_pass http://127.0.0.1:8000;
proxy_set_header Host $host;
proxy_set_header X-Real-IP $remote_addr;
proxy_set_header X-Forwarded-For $proxy_add_x_forwarded_for;
proxy_set_header X-Forwarded-Host $server_name;
proxy_set_header X-Forwarded-Proto $scheme;
proxy_read_timeout 1200s;
# used for view/edit office file via Office Online Server
client_max_body_size 0;
}
location /seafhttp {
rewrite ^/seafhttp(.*)$ $1 break;
proxy_pass http://127.0.0.1:8082;
client_max_body_size 0;
proxy_set_header X-Forwarded-For $proxy_add_x_forwarded_for;
proxy_connect_timeout 36000s;
proxy_read_timeout 36000s;
}
location /media {
#实际静态文件路径
root /home/seafile/seafile-server-latest/seahub;
}
location /seafdav {
proxy_pass http://127.0.0.1:8080/seafdav;
proxy_set_header Host $host;
proxy_set_header X-Real-IP $remote_addr;
proxy_set_header X-Forwarded-For $proxy_add_x_forwarded_for;
proxy_set_header X-Forwarded-Host $server_name;
proxy_set_header X-Forwarded-Proto $scheme;
proxy_read_timeout 1200s;
client_max_body_size 0;
}
#实际宝塔安装路径
access_log /www/wwwlogs/ceshi.ittel.cn.log seafileformat;
error_log /www/wwwlogs/ceshi.ittel.cn.error.log;
}
|
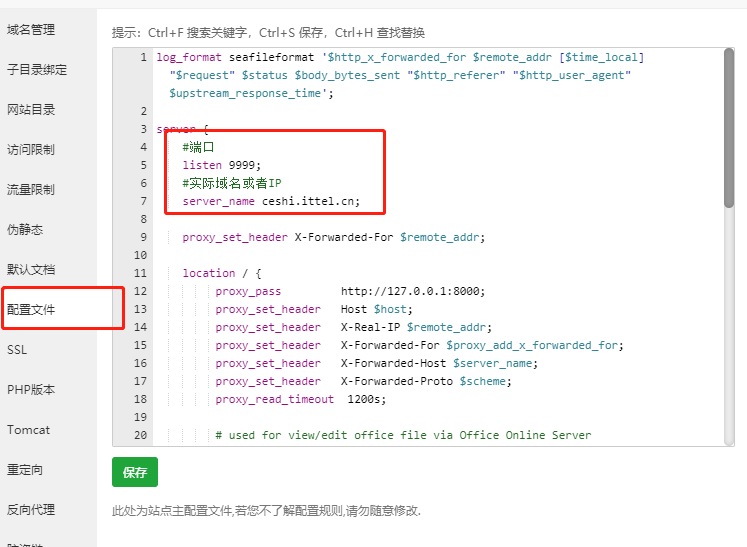
需要修改的都已经标注
![img]()
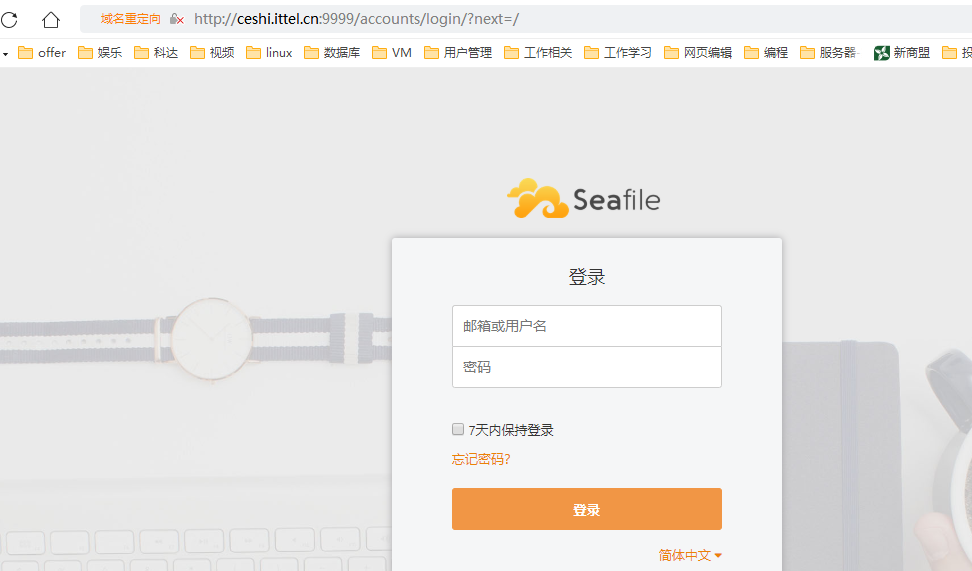
保存并验证网站
访问设置的域名和端口,可以访问即可。
![img]()
通过 Web 对seafile服务器进行配置
脚本安装完成后,您需要通过 Web UI 服务器进行基本的配置,以便能正常的从网页端进行文件的上传和下载:
- 首先在浏览器中输入服务器的地址,并用管理员账号和初始密码登录
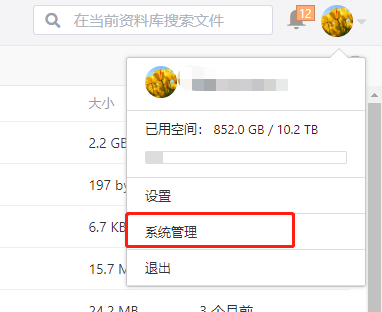
- 点击界面的右上角的头像按钮进入管理员界面
![img]()
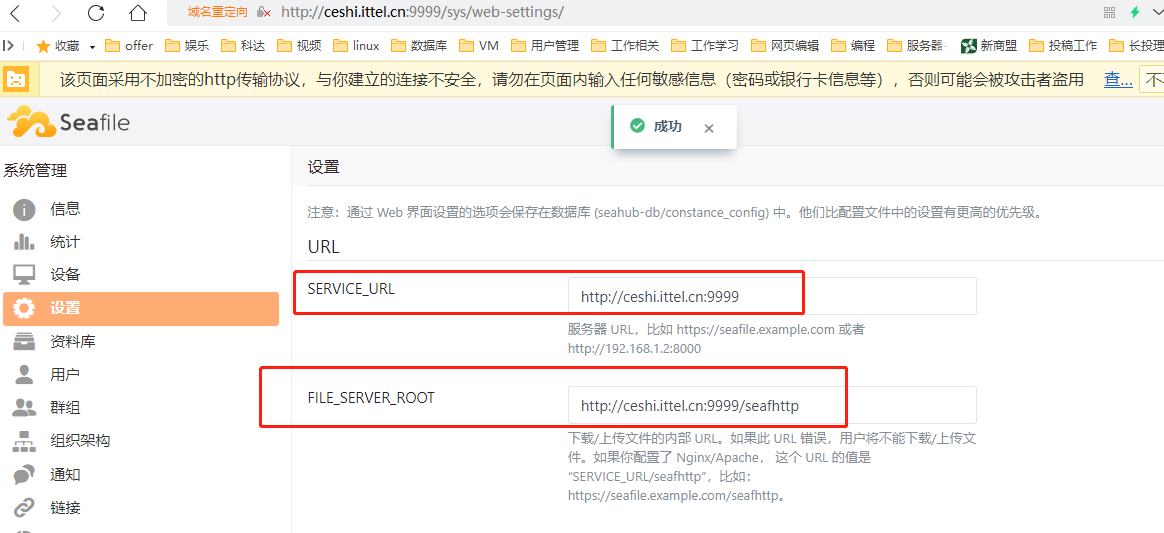
- 进入设置页面填写实际的服务器对外的 SERVICE_URL 和 FILE_SERVER_ROOT,比如
![img]()
如何重启服务
自动安装脚本会在系统中安装开机自动启动脚本。大家如果需要关闭/启动 Seafile 服务,命令如下:
Ubuntu18.0.4及以上/Deepin 10
1
2
3
4
5
| #关闭seafile
service seafile-server stop
#启动seafile
service seafile-server start
|
Centos8.X
1
2
3
4
5
6
| #关闭seafile
systemctl stop seafile
systemctl stop seahub
#启动seafile
systemctl start seafile
systemctl start seahub
|
激活步骤
点击查看