Nginx proxy_set_header:即允许重新定义或添加字段传递给代理服务器的请求头。该值可以包含文本、变量和它们的组合。在没有定义proxy_set_header时会继承之前定义的值。默认情况下,只有两个字段被重定义:
1
| proxy_set_header Host $proxy_host;``proxy_set_header Connection close;
|
如果启用缓存,来自之前请求的头字段“If-Modified-Since”, “If-Unmodified-Since”, “If-None-Match”, “If-Match”, “Range”, 和 “If-Range” 将不会被代理服务器传递。
一个不会变化的“Host”头请求字段可通过如下方式被传递:
1
| proxy_set_header Host $http_host;
|
然后,当字段不在请求头中就无法传递了,在这种情况下,可通过设置Host变量,将需传递值赋给Host变量
1
| proxy_set_header Host $host;
|
此外,服务器名称和端口一起通过代理服务器传递
1
| proxy_set_header Host $host:$proxy_port;
|
如果请求头的存在空的字段将不会通过代理服务器传递出去
1
| proxy_set_header Accept-Encoding "";
|
简而言之,proxy_set_header 就是可设置请求头-并将头信息传递到服务器端,不属于请求头的参数中也需要传递时,重定义下即可!
================================接下来看下测试案例=========================
1
2
3
4
5
6
7
8
9
10
11
12
13
14
15
16
17
18
19
20
21
22
23
24
25
26
27
28
29
30
31
32
33
34
35
36
37
38
39
40
41
42
43
44
45
46
47
48
49
50
51
52
53
54
55
56
57
58
59
60
61
62
63
64
65
66
67
68
69
70
71
72
73
74
75
76
77
78
79
80
81
82
83
84
85
86
87
88
89
90
91
92
93
94
95
96
97
98
99
100
101
102
103
104
105
106
107
108
109
110
111
112
113
114
115
116
117
118
119
120
121
122
| 1)如下测试,不设置 proxy_set_header
Nginx 配置:
upstream test {
server 192.168.1.123:9099;
server 192.168.1.123:58080;
}
server {
listen 5800;
server_name 192.168.1.123;
root /usr/share/nginx/html;
include /etc/nginx/default.d/*.conf;
location / {
proxy_pass http://test;
}
测试jsp 想获取客户端IP、客户端port、代理服务器IP、代理服务器port
<%@page contentType="text/html; charset=UTF-8" trimDirectiveWhitespaces="true"%>
String scheme = request.getScheme();
String serverName = request.getServerName();
String remoteName = request.getRemoteAddr();
String realIP = request.getHeader("X-Forwarded-For");
String realIP2 = request.getHeader("X-Real-IP");
String Host = request.getHeader("Host");
int port = request.getServerPort();
int portR = request.getRemotePort();
String requestURIC1 = scheme+"://"+realIP+":"+portR;
String requestURIC2 = scheme+"://"+realIP2+":"+portR;
String requestURIC3 = scheme+"://"+remoteName+":"+portR;
String requestURI = scheme+"://"+serverName+":"+port;
其中:
客户端地址1:<%=requestURIC1 %>
客户端地址2:<%=requestURIC2 %>
客户端地址3:<%=requestURIC3%>
服务器地址1:<%=requestURI%>
服务器地址2:<%=Host%>
测试结果
客户端地址1:http://null:58828
客户端地址2:http://null:58828
客户端地址3:http://192.168.1.123:58828
服务器地址1:http://test:80
服务器地址2:test
Nginx日志
192.168.1.177 -20508---5800 [25/Aug/2016:16:34:13 +0800] "GET /docs/test.jsp HTTP/1.1" 200 223 "
其中客户端IP不能获取到,而通过request.getRemoteAddr();
获取的IP是代理服务器IP,而不是客户端IP,而在nginx中$remote_addr变量的值是客户端的IP,可见remoteaddr没有传递。
而server_port值也不对,当前值为5800,当前打印出的是80。
而当前代理为http://test 所有通过host得到的是test。
客户端port也获取不到值为20508,可传给应用的是58828
----------------------------------------------------------------------------------------------------------------
2)如下测试,设置 proxy_set_header
Nginx 配置:
upstream test {
server 192.168.1.123:9099;
server 192.168.1.123:58080;
}
server {
listen 5800;
server_name 192.168.1.123;
root /usr/share/nginx/html;
include /etc/nginx/default.d/*.conf;
location / {
proxy_pass http://test;
proxy_set_header Host $host:$server_port;
proxy_set_header X-Real-IP $remote_addr;
proxy_set_header X-Real-PORT $remote_port;
proxy_set_header X-Forwarded-For $proxy_add_x_forwarded_for;
}
测试页面改成:
<%@page contentType="text/html; charset=UTF-8" trimDirectiveWhitespaces="true"%>
<%
String scheme = request.getScheme();
String serverName = request.getServerName();
String remoteName = request.getRemoteAddr();
String realIP = request.getHeader("X-Forwarded-For");
String realIP2 = request.getHeader("X-Real-IP");
String Host = request.getHeader("Host");
int port = request.getServerPort();
int portR = request.getRemotePort();
String portR2 = request.getHeader("X-Real-Port");
String requestURIC1 = scheme+"://"+realIP+":"+portR;
String requestURIC2 = scheme+"://"+realIP2+":"+portR;
String requestURIC3 = scheme+"://"+remoteName+":"+portR;
String requestURI = scheme+"://"+serverName+":"+port;
%>
其中:
客户端地址1:<%=requestURIC1 %>
客户端地址2:<%=requestURIC2 %>
客户端地址3:<%=requestURIC3%>
服务器地址1:<%=requestURI%>
服务器地址2:<%=Host%>
客户端port2:<%=portR2%>
客户端地址1:http://192.168.1.177:21548
客户端地址2:http://192.168.1.177:21548
客户端地址3:http://192.168.1.123:21548
服务器地址1:http://192.168.1.123:5800
服务器地址2:192.168.1.123:5800
客户端port2:20604
nginx日志:
192.168.1.177 -20604---5800 [25/Aug/2016:16:38:42 +0800] "GET /docs/test.jsp HTTP/1.1" 200 275 "-" "Mozilla/5.0 (Windows NT 6.3; WOW64) AppleWebKit/537.36 (KHTML, like Gecko) Chrome/51.0.2704.106 Safari/537.36" "-"
除request.getRemoteAddr();获取的值不对外,其他值都是对的。
getRemoteAddr获取的是代理的请求地址。
因重定义了host,所以test值被改写成代理服务器IP。
因重定义了 X-Real-PORT-并传递$remote_port,客户端port也获取正确了。
|
======================proxy_set_header自定义header头无效的问题========================
1
2
3
4
5
6
7
8
9
10
11
12
13
14
15
16
17
18
19
20
21
22
23
24
25
26
27
28
29
30
31
32
33
34
35
36
37
38
39
40
41
42
43
44
| nginx反向代理中经常碰过的一个"坑":proxy_set_header自定义header头无效的问题
解决办法:
nginx underscores_in_headers默认off
可以用减号-替代下划线符号_,避免这种变态问题。nginx默认忽略掉下划线可能有些原因。
upstream os-8080 {
ip_hash;
server 192.168.1.20:8080 max_fails=3 fail_timeout=15s;
server 192.168.1.21:8080 max_fails=3 fail_timeout=15s;
}
server {
listen 80;
server_name bpm.wangshibo.com;
access_log /data/nginx/logs/bpm.wangshibo.com-access.log main;
error_log /data/nginx/logs/bpm.wangshibo.com-error.log;
nginx underscores_in_headers on;
location / {
proxy_pass http://os-8080;
proxy_redirect off ;
proxy_set_header Host $host;
proxy_set_header X-Real-IP $remote_addr;
proxy_set_header REMOTE-HOST $remote_addr;
proxy_set_header X-Forwarded-For $proxy_add_x_forwarded_for;
proxy_connect_timeout 300;
proxy_send_timeout 300;
proxy_read_timeout 600;
proxy_buffer_size 512k;
proxy_buffers 8 512k;
proxy_busy_buffers_size 512k;
proxy_temp_file_write_size 512k;
proxy_next_upstream error timeout invalid_header http_500 http_502 http_503 http_504 http_404;
proxy_max_temp_file_size 128m;
}
error_page 500 502 503 504 /50x.html;
location = /50x.html {
root html;
}
}
|
================proxy_set_header中$proxy_host,$host,$http_host的区别================
1
2
3
4
5
6
7
8
9
10
11
12
| 在使用Nginx做反向代理的时候,proxy_set_header功能可以设置反向代理后的http header中的host,$http_host,$proxy_host,那么这几个有什么区别呢?
Nginx的官网文档中说下面这两条是做反代时默认的,所以$proxy_host 自然是 proxy_pass后面跟着的host了
proxy_set_header Host $proxy_host;
proxy_set_header Connection close;
如果客户端发过来的请求的header中有’HOST’这个字段时,
$http_host和$host都是原始的’HOST’字段
比如请求的时候HOST的值是www.csdn.net 那么反代后还是www.csdn.net
如果客户端发过来的请求的header中没有有’HOST’这个字段时,
建议使用$host,这表示请求中的server name。
|
==================不妨看一个proxy_set_header配置实例==================
1
2
3
4
5
6
7
8
9
10
11
12
13
14
15
16
17
18
19
20
21
22
23
24
25
26
27
28
29
30
31
32
33
34
35
36
37
38
39
40
41
42
43
44
45
46
| windows客户端(请求web服务):192.168.1.1
nginx作为反向代理服务器:192.168.1.136
nginx作为后端web服务器:192.168.1.137
前提条件:配置nginx转发到后端服务器
server {
listen 8080;
server_name 192.168.1.136;
location / {
root "/www/html";
index index.html;
error_page 404 /404.html;
}
location /images/ {
root "/www";
rewrite ^/images/bbs/(.*\.jpeg)$ /images/$1 break;
rewrite ^/images/www/(.*)$ http://192.168.1.136/$1 redirect;
}
location /basic_status {
stub_status;
}
location ^~/proxy_path/ {
root "/www/html";
index index.html;
proxy_pass http://192.168.1.137/;
proxy_set_header Host $host;
proxy_set_header X-Real-IP $remote_addr;
proxy_set_header X-Forwarded-For $proxy_add_x_forwarded_for;
}
location ^~/proxy_path/ {
root "/www/html";
index index.html;
proxy_pass http://192.168.1.137/;
}
}
将左侧匹配到的/proxy_path/开头的url全部转发到后端服务器192.168.223.137
|
下面将一一测试各个proxy_set_header设置的变量的内容:
1
2
3
4
5
6
7
8
9
10
11
12
13
| 1)proxy_set_header Host $host;
将136代理服务器,137后端服务器的log_format修改为如下:
log_format main '$remote_addr - $remote_user [$time_local] "$request" $http_host '
'$status $body_bytes_sent "$http_referer" '
'"$http_user_agent" "$http_x_forwarded_for"';
proxy_set_header Host $host; 这里的Host变量的值对应的就是日志中的$http_host 的值
当windows用户访问http://192.168.1.136:8080/proxy_path/index.html时
查看代理服务器和后端服务器的地址,可以发现$http_host对应的值为192.168.1.136:8080
192.168.1.1 - - [18/Jul/2017:10:21:25 +0800] "GET /favicon.ico HTTP/1.1" 192.168.1.136:8080 404 24 "http://192.168.1.136:8080/proxy_path/index.html"
"Mozilla/5.0 (Windows NT 10.0; Win64; x64) AppleWebKit/537.36 (KHTML, like Gecko) Chrome/59.0.3071.115 Safari/537.36" "-"
|
如果将后端服务器关闭了,则会出现502网管错误:
![img]()
1
2
3
4
| 然后开启137后端nginx,查看日志:
192.168.1.136 "192.168.1.1" - - [17/Jul/2017:17:06:44 +0800] "GET /index.html HTTP/1.0" "192.168.1.136" 304 0 "-" "Mozilla/5.0
(Windows NT 10.0; WOW64; Trident/7.0; rv:11.0) like Gecko" "192.168.1.1"
即验证了proxy_set_header Host $host; $host就是nginx代理服务器,也就是windows客户端请求的host
|
1
2
3
4
5
6
7
8
9
10
11
12
13
14
15
16
17
18
19
20
21
22
23
24
25
26
27
28
29
30
31
32
33
34
35
36
37
38
39
40
41
42
43
44
45
46
47
48
49
50
51
52
53
54
55
56
57
58
59
60
61
62
63
64
65
66
67
68
69
70
71
72
73
74
75
76
77
78
79
80
81
82
83
84
85
86
87
88
89
90
91
92
93
94
95
96
97
98
99
100
101
102
103
104
105
106
| 2)proxy_set_header Host $proxy_host;
将设置修改为上述proxy_host然后重启ngxin代理服务器136
[root@wadeson nginx]# sbin/nginx -s reload
重新请求代理页面:http://192.168.1.136:8080/proxy_path/index.html,然后日志如下:
首先查看136代理服务器的日志:
192.168.1.1 - - [18/Jul/2017:10:30:12 +0800] "GET /proxy_path/index.html HTTP/1.1" 192.168.1.136:8080 304 0 "-" "Mozilla/5.0
(Windows NT 10.0; Win64; x64) AppleWebKit/537.36 (KHTML, like Gecko) Chrome/59.0.3071.115 Safari/537.36" "-"
因为windows是136的客户端,请求的host为192.168.223.136:8080,而nginx代理服务器作为137后端服务器的客户端,将请求的报文首部重新封装,
将proxy_host封装为请求的host
那么137上面日志请求的host就是其自身,proxy_host就是代理服务器请求的host也就是后端服务器137
192.168.1.136 "192.168.1.1" - - [18/Jul/2017:10:30:12 +0800] "GET /index.html HTTP/1.0" "192.168.1.137" 304 0 "-" "Mozilla/5.0
(Windows NT 10.0; Win64; x64) AppleWebKit/537.36 (KHTML, like Gecko) Chrome/59.0.3071.115 Safari/537.36" "192.168.1.1"
3)proxy_set_header Host $host:$proxy_port;
了解了上面的知识,那么此处对应的host就知道代表的啥了,$host代表转发服务器,$proxy_port代表136转发服务器请求后端服务器的端口,也就是80。
于是观察136、137的日志进行验证:
192.168.1.1 - - [18/Jul/2017:10:38:38 +0800] "GET /proxy_path/index.html HTTP/1.1" 192.168.1.136:8080 304 0 "-" "Mozilla/5.0
(Windows NT 10.0; Win64; x64) AppleWebKit/537.36 (KHTML, like Gecko) Chrome/59.0.3071.115 Safari/537.36" "-"
192.168.1.136 "192.168.1.1" - - [18/Jul/2017:10:38:38 +0800] "GET /index.html HTTP/1.0" "192.168.1.136:80" 304 0 "-" "Mozilla/5.0
(Windows NT 10.0; Win64; x64) AppleWebKit/537.36 (KHTML, like Gecko) Chrome/59.0.3071.115 Safari/537.36" "192.168.1.1"
4)proxy_set_header X-Real-IP $remote_addr;
将$remote_addr的值放进变量X-Real-IP中,此变量名可变,$remote_addr的值为客户端的ip
nginx转发136服务器日志格式为:
log_format main '$remote_addr - $remote_user [$time_local] "$request" $http_host '
'$status $body_bytes_sent "$http_referer" '
'"$http_user_agent" "$http_x_forwarded_for"';
nginx后端137服务器的日志格式:
log_format main '$remote_addr "$http_x_real_ip" - $remote_user [$time_local] "$request" "$http_host" '
'$status $body_bytes_sent "$http_referer" '
'"$http_user_agent" "$http_x_forwarded_for"';
两者区别在于"$http_x_real_ip",添加了这个变量的值
重新请求需要访问的地址http://192.168.1.136:8080/proxy_path/index.html
136的日志:
192.168.1.1 - - [18/Jul/2017:10:45:07 +0800] "GET /proxy_path/index.html HTTP/1.1" 192.168.1.136:8080 304 0 "-" "Mozilla/5.0
(Windows NT 10.0; Win64; x64) AppleWebKit/537.36 (KHTML, like Gecko) Chrome/59.0.3071.115 Safari/537.36" "-"
137的日志:
192.168.1.136 "192.168.1.1" - - [18/Jul/2017:10:45:07 +0800] "GET /index.html HTTP/1.0" "192.168.1.136:80" 304 0 "-" "Mozilla/5.0
(Windows NT 10.0; Win64; x64) AppleWebKit/537.36 (KHTML, like Gecko) Chrome/59.0.3071.115 Safari/537.36" "192.168.1.1"
红色标记的就是"$http_x_real_ip"的值,即可以看见用户真实的ip,也就是客户端的真实ip
5)proxy_set_header X-Forwarded-For $remote_addr;
理解了上面的含义那么这个封装报文的意思也就请求了
首先还是比对136和137的日志格式:
136代理服务器的日志格式:
log_format main '$remote_addr - $remote_user [$time_local] "$request" $http_host '
'$status $body_bytes_sent "$http_referer" '
'"$http_user_agent" "$http_x_forwarded_for"';
137后端服务器的日志格式:
log_format main '$remote_addr "$http_x_real_ip" - $remote_user [$time_local] "$request" "$http_host" '
'$status $body_bytes_sent "$http_referer" '
'"$http_user_agent" "$http_x_forwarded_for"';
重新请求需要访问的地址http://192.168.1.136:8080/proxy_path/index.html
136的日志显示:
192.168.1.1 - - [18/Jul/2017:10:51:25 +0800] "GET /proxy_path/index.html HTTP/1.1" 192.168.1.136:8080 304 0 "-" "Mozilla/5.0
(Windows NT 10.0; Win64; x64) AppleWebKit/537.36 (KHTML, like Gecko) Chrome/59.0.3071.115 Safari/537.36" "-",最后一个字段
"$http_x_forwarded_for"对应的为空值
137的日志显示:
192.168.1.136 "192.168.1.1" - - [18/Jul/2017:10:51:25 +0800] "GET /index.html HTTP/1.0" "192.168.1.136:80" 304 0 "-" "Mozilla/5.0
(Windows NT 10.0; Win64; x64) AppleWebKit/537.36 (KHTML, like Gecko) Chrome/59.0.3071.115 Safari/537.36" "192.168.1.1"
可以看出137后端服务器成功的显示了真实客户端的ip
6)proxy_set_header X-Forwarded-For $proxy_add_x_forwarded_for;
5、6两者的区别:
在只有一个代理服务器的转发的情况下,两者的效果貌似差不多,都可以真实的显示出客户端原始ip
但是区别在于:
$proxy_add_x_forwarded_for变量包含客户端请求头中的"X-Forwarded-For",与$remote_addr两部分,他们之间用逗号分开。
##################################################################################################################
举个例子,有一个web应用,在它之前通过了两个nginx转发,www.kevin.com 即用户访问该web通过两台nginx。
在第一台nginx中,使用
proxy_set_header X-Forwarded-For $proxy_add_x_forwarded_for;
现在的$proxy_add_x_forwarded_for变量的"X-Forwarded-For"部分是空的,所以只有$remote_addr,而$remote_addr的值是用户的ip,于是赋值以后,
X-Forwarded-For变量的值就是用户的真实的ip地址了。
到了第二台nginx,使用
proxy_set_header X-Forwarded-For $proxy_add_x_forwarded_for;
现在的$proxy_add_x_forwarded_for变量,X-Forwarded-For部分包含的是用户的真实ip,$remote_addr部分的值是上一台nginx的ip地址,
于是通过这个赋值以后现在的X-Forwarded-For的值就变成了"用户的真实ip,第一台nginx的ip",这样就清楚了吧。
|
###### Nginx反向代理Tomcat访问报错400问题 #######
线上用nginx反向代理tomcat访问,配置完成后,直接访问tomcat完全正常,但是只要在nginx添加反向代理tomcat,访问nginx就会报错400。
原因和解决办法:
1)后端服务器设置有类似防盗链或者根据http请求头中的host字段来进行路由或判断功能的话,如果nginx代理层不重写请求头中的host字段,将会导致请求失败,报400错误。
解决办法:
1
| proxy_set_header Host $http_host;
|
2)nginx配置中header头部信息的host不能被配置重了。tomcat没有对headers中的host进行唯一校验。
解决办法(下面两个要去掉一个):
1
2
| proxy_set_header Host $host;
proxy_set_header Host $http_host; #去掉这一行
|
案例:
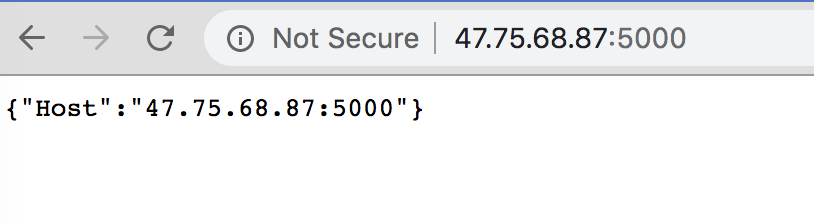
1、直接访问
浏览器直接访问服务器
结果:浏览器访问IP+端口
![img]()
不设置 proxy_set_header Host 时,浏览器直接访问 nginx,获取到的 Host 是 proxy_pass 后面的值,即 $proxy_host 的值,参考
http://nginx.org/en/docs/http/ngx_http_proxy_module.html#proxy_set_header
1
2
3
4
5
6
7
8
| # cat ngx_header.conf
server {
listen 8090;
server_name _;
location / {
proxy_pass http://172.31.5.0:5000;
}
}
|
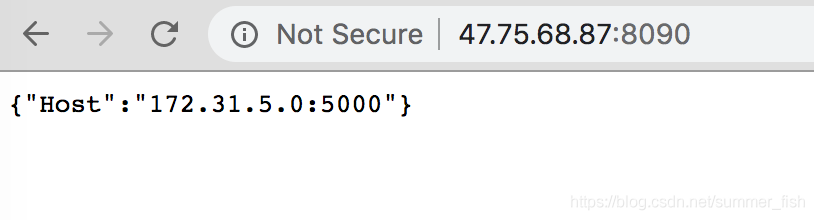
结果如下:**返回proxy_pass 后面的值**
![在这里插入图片描述]()
1
2
3
4
5
6
7
8
| server {
listen 8090;
server_name _;
location / {
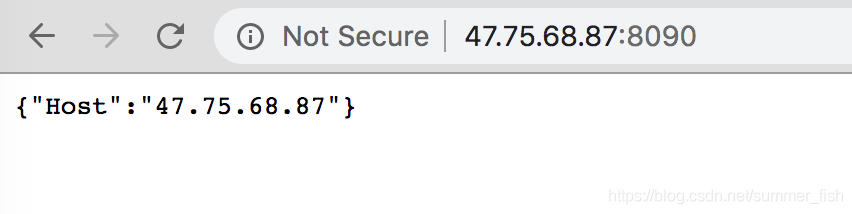
proxy_set_header Host $host;
proxy_pass http://172.31.5.0:5000;
}
}
|
结果如下:**不再是 proxy_pass代理的ip地址了, 不包含端口**
![在这里插入图片描述]()
1
2
3
4
5
6
7
8
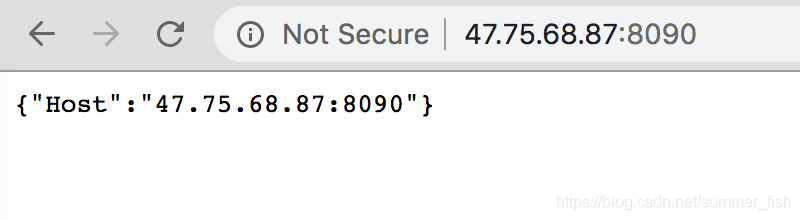
| server {
listen 8090;
server_name _;
location / {
proxy_set_header Host $http_host;
proxy_pass http://172.31.5.0:5000;
}
}
|
![在这里插入图片描述]()
提示: 设置 proxy_set_header Host $host 时,浏览器直接访问 nginx,获取到的 Host 是 $host 的值,没有端口信息。此时代码中如果有重定向路由,那么重定向时就会丢失端口信息,导致 404