Seafile-Pro 8.0.x~8.0.17专业版一键部署+Docker部署

[TOC]

说明

手动安装官方文档参考:部署 Seafile 专业版

Onlyoffice去限制部署 点击这里

Seafile-Pro 8.0.x激活补丁下载

一、一键安装脚本部署

一键安装脚本可以帮助您在 Ubuntu 18.04/20.04 系统上快速的安装好 Seafile 服务器,并配置好 MariaDB, Memcached, WebDAV, Ngnix 和开机自动启动脚本。

安装步骤

安装干净的 Ubuntu 18.04/20.04,并做好镜像 (如果安装失败需要还原到镜像)。

切换成 root 账号 (sudo -i)

获取安装脚本

适用于 Seafile 8.0.x 及以上版本

1
wget https://raw.githubusercontent.com/haiwen/seafile-server-installer-cn/master/seafile-8.0_ubuntu

适用于 Seafile 9.0.x 及以上版本

1
wget https://raw.githubusercontent.com/haiwen/seafile-server-installer-cn/master/seafile-9.0_ubuntu

运行安装脚本并指定要安装的版本 (例如 8.0.0)

1
bash seafile-8.0_ubuntu 8.0.0

脚本会让您选择要安装的版本, 按照提示进行选择即可:

  • 如果要安装专业版, 需要先将下载好的专业版的包 seafile-pro-server_8.0.0_x86-64.tar.gz 放到 /opt/ 目录下
  • 如果是安装开源版,安装脚本在执行过程中会检查 /opt目录下是否有指定版本号的安装包,如果存在则会安装此包,否则会从 Seafile 网站下载。所以,为了避免因下载失败而导致安装中断,您可以提前下载好安装包放到/opt/目录下。

该脚本运行完后会在命令行中打印配置信息和管理员账号密码,请仔细阅读。(您也可以查看安装日志/opt/seafile/aio_seafile-server.log),MySQL 的 root 用户密码存储在 /root/.my.cnf 中;MySQL 的 seafile 用户密码存储在 /opt/seafile.my.cnf 中。

通过 Web UI 对服务器进行配置

安装完成后,您需要通过 Web UI 服务器进行基本的配置,以便能正常的从网页端进行文件的上传和下载:

  1. 首先在浏览器中输入服务器的地址,并用管理员账号和初始密码登录

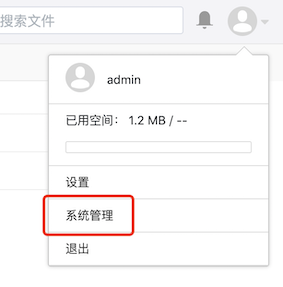
  2. 点击界面的右上角的头像按钮进入管理员界面 管理员入口

  3. 进入设置页面填写正确的服务器对外的 SERVICE_URL 和 FILE_SERVER_ROOT,比如

    1
    2
    SERVICE_URL: http://www.example.com
    FILE_SERVER_ROOT: http://www.example.com/seafhttp

现在您可以退出管理员界面,并进行基本的测试。关于服务器的配置选项介绍和日常运维可以参考 https://cloud.seafile.com/published/seafile-manual-cn/config/README.md

如果安装脚本出错

如果安装脚本出错,您需要重置虚拟机到干净的镜像。

启动关闭服务

自动安装脚本会在系统中安装开机自动启动脚本。您也可以使用该脚本来关闭/启动 Seafile 服务,命令如下:

1
2
service seafile-server stop
service seafile-server start

二、Docker部署(推荐)

Docker-compose.yml配置(已经激活)

1
2
3
4
5
6
7
8
9
10
11
12
13
14
15
16
17
18
19
20
21
22
23
24
25
26
27
28
29
30
31
32
33
34
35
36
37
38
39
40
41
42
43
44
45
46
47
48
49
50
51
52
53
54
55
56
57
58
59
60
61
62
63
version: '2.0'
services:
db:
image: mariadb:10.5
container_name: seafile-mysql
environment:
- MYSQL_ROOT_PASSWORD=db_dev # Requested, set the root's password of MySQL service.
- MYSQL_LOG_CONSOLE=true
volumes:
- ./mariaDB/db:/var/lib/mysql # Requested, specifies the path to MySQL data persistent store.
networks:
- seafile-net

memcached:
image: memcached:1.6
container_name: seafile-memcached
entrypoint: memcached -m 256
networks:
- seafile-net

elasticsearch:
image: seafileltd/elasticsearch-with-ik:5.6.16
container_name: seafile-elasticsearch
environment:
- discovery.type=single-node
- bootstrap.memory_lock=true
- "ES_JAVA_OPTS=-Xms1g -Xmx1g"
ulimits:
memlock:
soft: -1
hard: -1
mem_limit: 2g
volumes:
- ./eSearch:/usr/share/elasticsearch/data # Requested, specifies the path to Elasticsearch data persistent store.
networks:
- seafile-net

seafile:
image: registry.cn-hangzhou.aliyuncs.com/cyida/seafile:8.0.17
container_name: seafile
ports:
- "80:80"
- "443:443" # If https is enabled, cancel the comment.
#- "8888:8888" # If https is enabled, cancel the comment.
volumes:
- ./seafile-data:/shared # Requested, specifies the path to Seafile data persistent store.
environment:
- DB_HOST=db
- DB_ROOT_PASSWD=db_dev # Requested, the value shuold be root's password of MySQL service.
- TIME_ZONE=Asia/Shanghai # Optional, default is UTC. Should be uncomment and set to your local time zone.
- SEAFILE_ADMIN_EMAIL=admin@qq.com # Specifies Seafile admin user, default is 'me@example.com'
- SEAFILE_ADMIN_PASSWORD=123456 # Specifies Seafile admin password, default is 'asecret'
- SEAFILE_SERVER_LETSENCRYPT=false # Whether to use https or not
- SEAFILE_SERVER_HOSTNAME=yun.cyida.com # Specifies your host name if https is enabled
depends_on:
- db
- memcached
- elasticsearch
networks:
- seafile-net

networks:
seafile-net:

Seafile-pro 8.0x 激活去限制

教程及所需文件下载