前提 在开始Dzzoffice部署之前,系统应该已安装docker和docker-compose。如果想把此项目与其他容器项目在系统上隔离开来,可尝试使用虚拟环境virtualenv。
当前使用的是Dzzoffice:2.02.1最新版本。
下载源码 1 2 # 获取源码 git clone https://gitee.com/tengfeiwu/dzzoffice.git
制作镜像 1 2 3 4 5 构建image docker build -t registry.cn-shanghai.aliyuncs.com/tengfeiwu/dzzoffice:2.02.1 . 或拉取我人镜像 pull image docker pull registry.cn-shanghai.aliyuncs.com/tengfeiwu/dzzoffice:2.02.1
拉取我的:
1 2 先登陆: sudo docker login --username=jishou@qq.com registry.cn-hangzhou.aliyuncs.com
拉取:
1 docker pull registry.cn-hangzhou.aliyuncs.com/aisyun/dzzoffice:2.02.1
说明:
(1)如果想使用Dzzoffice其他版本,请自行在Dockerfile中替换对应版本即可。
Dockerfile: 1 2 3 4 5 6 7 8 9 10 11 12 13 14 15 FROM php:7.3 .8 -apache-stretchENV VERSION 2.02 RUN apt-get update && apt-get install -y libzip-dev libfreetype6-dev \ && docker-php-ext-install mysqli \ && docker-php-ext-install gd \ && docker-php-ext-install zip RUN curl -o /tmp/dzzoffice-2.02.1.tar.gz https://codeload.github.com/zyx0814/dzzoffice/tar.gz/2.02.1 \ && tar -xzvf /tmp/dzzoffice-2.02.1.tar.gz -C /tmp \ && rm -rf /tmp/dzzoffice-2.02.1.tar.gz /tmp/dzzoffice-2.02.1/*.md \ && mv /tmp/dzzoffice-2.02.1/* /var/www/html/ RUN chown -R www-data:www-data /var/www/html/
(2)如果不想自己build镜像可以直接使用我构建的,镜像已公开。
部署 Dzzoffice 创建挂载目录 拷贝 html 1 2 3 4 5 6 # 使用我们上面build的dzzoffice:2.02.1镜像 docker run -itd --name dzzoffice_temp registry.cn-shanghai.aliyuncs.com/tengfeiwu/dzzoffice:2.02.1 # 拷贝容器内文件 docker cp dzzoffice_temp:/var/www/html html/ # 删除 dzzoffice_temp docker rm -f dzzoffice_temp
启动服务 1 2 3 4 # 后台运行 docker-compose up -d # 查看状态 docker-compose ps
Dzzoffice初始化 浏览器访问 1 2 3 4 5 6 # 登陆链接 http://宿主机IP:1800 # 普通用户登陆入口: http://宿主机IP:1800/user.php?mod=login # 管理员登陆入口: http://宿主机IP:1800/admin.php?mod=orguser
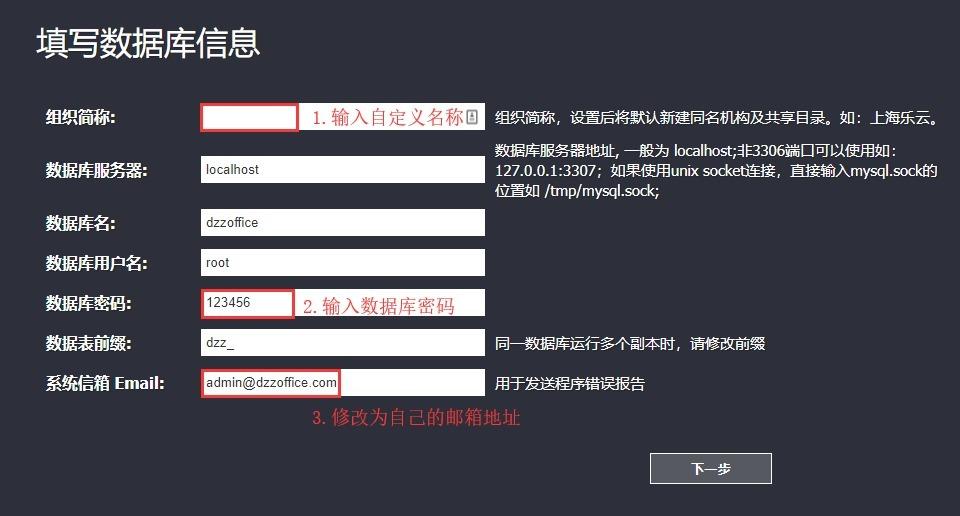
这里需要注意以下三点,具体如下:
MySQL连接配置
注意:
*(1)数据库服务器:由于我们使用的是容器部署,也为了方便,我这里直接使用的宿主机IP+容器映射出来的端口3307;
*(2)数据库名:dzzoffice 不需要手动在mysql创建;
*(3)数据库用户名:root,数据库密码:在docker-compose中有定义MYSQL_ROOT_PASSWORD=gmtools;
*(4)【可选】如果出现数据库链接拒绝,使用如下方法排查:
1 2 3 4 5 6 7 8 9 10 # 进入mysql容器 docker exec -it dzzoffice_mysql_1 /bin/bash # 登入mysql mysql -uroot -pgmtools # 查看授权 show grants for root@'%'; # 如果授权有问题,授权 grant all privileges on *.* to 'root'@'%' identified by 'gmtools'; # 刷新表 flush privileges;
应用启用 管理 –> 应用市场 –> 在应用市场内找到对应应用,单击一键安装;
管理 –> 应用市场 –> 已安装 中 点击启用按钮 启用此应用
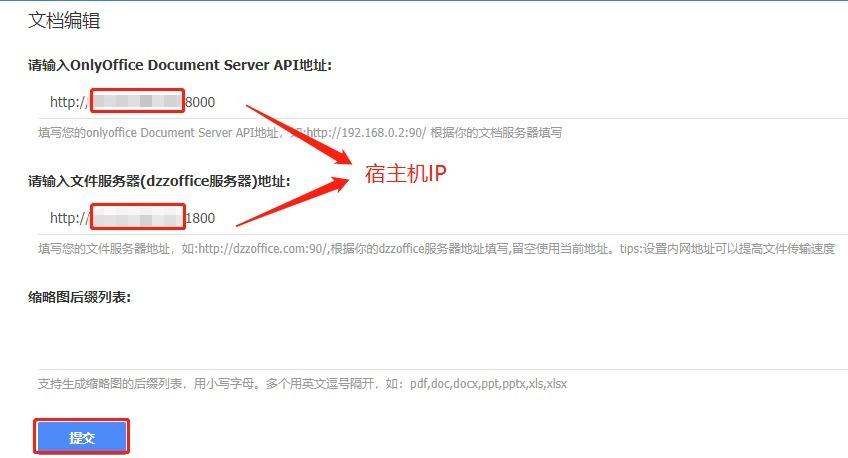
实现Onlyoffice在线预览和编辑 管理 –> 应用市场 –> 在应用市场内找到onlyoffice应用 点击 一键安装,安装完后,你可以通过http://ip:8000地址来测试onlyoffice是否安装成功,成功后进入下一步设置;
管理 –> 应用市场 –> 已安装 中 点击设置按钮 进入设置页面
[
Docker-Compose.yml 配置: 1 2 3 4 5 6 7 8 9 10 11 12 13 14 15 16 17 18 19 20 21 22 23 24 25 26 27 28 29 30 31 32 33 34 35 36 37 38 39 40 41 42 43 44 45 46 47 48 49 50 51 52 version: "2.2" networks: internal_network: services: mysql: restart: always networks: - internal_network image: mysql:5.7.27 environment: - MYSQL_ROOT_PASSWORD=gmtools volumes: - /data/wutengfei/dzzoffice/mysql:/var/lib/mysql expose: - "3306" ports: - "3307:3306" phpmyadmin: restart: always image: phpmyadmin/phpmyadmin:4.7.9-1 links: - "mysql" environment: - PMA_HOST=mysql volumes: - /data/wutengfei/dzzoffice/mysql:/var/lib/mysql expose: - "80" ports: - "1801:80" dzzoffice: restart: always networks: - internal_network image: registry.cn-shanghai.aliyuncs.com/tengfeiwu/dzzoffice:2.02.1 #land007/dzzoffice:latest volumes: - /data/wutengfei/dzzoffice/html:/var/www/html links: - "mysql" expose: - "80" ports: - "1800:80" onlyoffice: image: onlyoffice/documentserver:latest restart: always networks: - internal_network expose: - "80" ports: - "8000:80"
完整版Yaml:
1 2 3 4 5 6 7 8 9 10 11 12 13 14 15 16 17 18 19 20 21 22 23 24 25 26 27 28 29 30 31 32 33 34 35 36 37 38 39 40 41 42 43 44 45 46 47 48 49 50 51 52 53 54 55 56 57 58 59 60 61 62 63 64 65 66 67 68 69 70 71 72 73 74 75 76 77 78 79 80 81 82 83 84 85 86 87 88 89 90 91 92 93 94 95 96 97 98 99 100 101 102 103 104 105 106 107 108 109 110 version: "2.2" networks: internal_network: services: mysql: restart: always networks: - internal_network #network_mode: bridge image: mysql:5.7.27 environment: - MYSQL_ROOT_PASSWORD=gmtools volumes: - ~/docker/mysql:/var/lib/mysql expose: - "3306" ports: - "3307:3306" phpmyadmin: restart: always #network_mode: bridge image: phpmyadmin/phpmyadmin:4.7.9-1 links: - "mysql" environment: - PMA_HOST=mysql volumes: - ~/Documents/Kitematic/mysql:/var/lib/mysql expose: - "80" ports: - "1801:80" dzzoffice: restart: always networks: - internal_network #network_mode: bridge image: land007/dzzoffice:latest links: - "mysql" expose: - "80" #ports: #- "1800:80" onlyoffice: image: land007/documentserver:latest restart: always networks: - internal_network #network_mode: bridge expose: - "80" #ports: #- "8000:80" collabora: image: collabora/code:latest restart: always networks: - internal_network #network_mode: bridge expose: - "9980" ports: - "9980:9980" environment: - username=admin - password=S3cRet http-proxy: image: land007/http-proxy:latest restart: always networks: - internal_network #network_mode: bridge links: - "dzzoffice" - "onlyoffice" expose: - "80" ports: - "1800:80" environment: - http_proxy_domains=msa.gjxt.xyz:2324,msa.gjxt.xyz:2324,msa.gjxt.xyz:2324,msa.gjxt.xyz:2324,msa.gjxt.xyz:2324 - http_proxy_paths=/web-apps/apps/api/documents/api.js,/web-apps/,/5.4.2-46//,/cache/files/,/ - http_proxy_hosts=onlyoffice,onlyoffice,onlyoffice,onlyoffice,dzzoffice - http_proxy_ports=80,80,80,80,80 - http_proxy_pretends=true,false,true,true,false - ws_proxy_domains=msa.gjxt.xyz:2324 - ws_proxy_paths=/ - ws_proxy_hosts=onlyoffice - ws_proxy_ports=80 - password= #docker cp dzz.tar.gz dzzoffice-master_dzzoffice_1:/var/www/html #docker exec -it dzzoffice-master_dzzoffice_1 bash #tar -zxvf dzz.tar.gz #OnlyOffice Document Server API地址: #/web-apps/apps/api/documents/api.js #文件服务器(dzzoffice服务器)地址: #http://dzzoffice/ #unset ${!DOCKER_*} #sudo docker-compose up -d #sudo docker-compose down #防火墙 #[root@liang ~]# firewall-cmd --zone=public --add-port=1800/tcp --permanent #[root@liang ~]# firewall-cmd --reload #文件存放地址 #/var/www/html/data/attachment/dzz/


